
In this Assignment I will need to create a range of book designs for Daniel Defoe’s classic novel Robinson Crusoe. The publisher is Viking press, and the book will be published in 2 different editions, one pocket edition, and one that is more of a deluxe edition for home reading. I find this quite exciting as I think this will allow me to go quite wild with it, and create covers that are very different from each other.
I picked out some basic characteristics that I should keep in mind when designing these covers.
Characteristics for the paperback edition
- modern visual feel
- portable/lightweight
- pocket sized
Characteristics for the deluxe edition:
- classic bookbinding
- luxurious
- nod to historical context
As a side project, Viking books would also like to get a cover designed for Washed ashore: The ultimate guide to surviving on a desert island by Rik Bennett. This is a guide book and should be a practical book that screams adventure. This needs to have a loose connection to the Robinson Crusoe book, but should look quite different as it is a completely different genre. I will need to research some guide books when it comes to this one.
Research
As a first step I wanted to see what other designers have made for this book in the past to use the technique from the last exercise and see what makes them tick.

This very first edition of the novel depicts the adventurer of the story. Interestingly I could not find an image of the actual cover of the book. I am assuming that the cover was quite plain, and therefore this title page is what is often depicted when you look up the book.


Found this pretty hard to read, but I guess this is natural for something that was printed in the early 18th century.

I found this beautiful leather bound edition from 1831. I found the idea of having different volumes truly inspiring. I think this could form a good basis for a portable book, because this could make the volumes easier to carry around. I was pondering this idea at the beginning but now I felt like it is not such a fresh idea after all. I was wondering what the reasoning behind publishing the books in such manner in the first place was in 1831. I think this may have been due to technical difficulties, but not too sure.
I found a website that I might subscribe to in the future, but for now, I think the info I can get from it for free is good enough. Home | ISBNdb It is a book catalogue with all the data around the books.
I looked up Robinson Crusoe, and the site has returned 7857 results! I have not realised that a single novel could have so many different editions. I have picked out a few covers, all of these are courtesy of ISBNdb.com.


I tried to collate as many different styles of covers as possible to see what came before and analyse what elements are connecting these covers. The pattern I have notice can be boiled down to the following elements:
- Sand
- bearded man/hero
- parrot
- spear/weapon
- water
- palm trees
- scoping, looking to the distance
I will try to keep these elements in mind when coming up with ideas for my cover.
Next I wanted to see what is currently popular when it comes to pocket editions of books and also what is considered luxurious for the hard cover deluxe edition.

For this research, I went to the local supermarket (at the time of doing this assignment bookshops were closed due to the pandemic) to see what stands out to me the most.
What I instantly noticed as a trend is the use of spot UV on almost every cover. It makes the designs more tactile for sure. Most books also use some embossing and some metallic foils to make the designs come alive even more. Some use all 3 of these techniques plus use some strong colours. This is beautifully used in The Authenticity Project’s cover.

The Authenticity Project – Clare Pooley 
Safe and sound by Philippa East
For hard cover books there are some of the above mentioned elements, but they afford some more interest when it comes to the cover. The Thursday Murder Club by Richard Osman used this to it’s advantage. I love how the dust jacket is fairly busy and loud with lots of interesting typographic elements, but when you pull off the dust jacket the book is relatively simple with the fox emblem in silver foil at the front with no title.


The other book that really jumped out, was The boy, the mole, the fox and the horse by Charlie Mackesy. The book has nor dust jacket which I fount slightly odd for a hard cover book. The book has a spine that is contrasting with the cover and cloth bound with some gold embossing on the spine. The entire book is laid out in a handwritten font with some sketches of the story. Really beautiful.


I found looking at these books so much more inspiring than the paperback counterparts. I was wondering if there would be some way to make paperback a tad more interesting. Perhaps I could utilise some elements that are usually included in hardback book designs.
Viking Press
Next I wanted to find out a little more about the publisher; Viking Press. I found out that this imprint now part of the Penguin Books group. Found the below info about them.
Viking is a legendary imprint with a distinguished list of extraordinary writers in both fiction and nonfiction. The Viking Press was founded in New York City on March 1, 1925, by Harold K. Guinzburg and George S. Oppenheimer. When the Viking logo, a ship drawn by Rockwell Kent, was chosen as a symbol of enterprise, adventure, and exploration in publishing, the popular authors included Sherwood Anderson, James Joyce, and D.H. Lawrence.
Viking Books – Penguin Books USA

I found it quite interesting that the logo of the publisher is a ship. Really fitting with the story of Robinson Crusoe.
I tried to look if there was a particular style that they were sticking to, but couldn’t quite identify anything distinct, so I think I won’t need to worry about this too much.
Sketching / Digital Exploration
I wanted to jump into sketching while I had some ideas in mind for my covers and see if I can do some digital exploration of ideas as well.
Started with a mind map to start to explore my understanding of the story.

I then moved onto trying to explore some cover ideas by sketching.

I was creating some sketches and researching some more at the same time to widen my possible choices.
I have come across a very interesting review of the book: This is one of those books that really serves to remind a modern audience of why we should kill whitey. Robinson Crusoe is the story of a young man with atrociously bad luck who, unfortunately for any shipmates he ever has, suffers from an extreme case of wanderlust. Every ship he gets onto sinks, but he just keeps getting onto them. Even after he’s got a nice, successful plantation of his own, he decides he’s just GOT to get on ANOTHER ship to — get this — procure himself some slaves. It crashes of course, and he gets stranded alone on an island.
Not to worry, though — he’s got a bible, and he successfully becomes a religious zealot while alone with nothing better to do. It’s too bad that his only book couldn’t have been a copy of Don Quixote or something because maybe then he’d have become a more interesting storyteller. But no, like so many people who have terrible luck, he turns to “god” and starts counting his “blessings,” more-or-less out of a lack of anything better to do. …
Melissa (Philadelphia, PA)’s review of Robinson Crusoe (goodreads.com)
I really liked this point of view and I thought it would make a funny cover story, so I included it in my sketches (bottom left sketch).

I wanted to explore some of these ideas in more depth, so I started to look at them individually and think about the different ways they could be executed. My favourites for a paperback were (numbering in reading order) no2, no3, no5, no8, no9, no10. Quite a few… That is exactly 6, so I wanted to distil these into one sketch, to show them all in one place, and perhaps tidy them up a little.

I also shared my sketches in a student group I am a part of to see what the other design students think.
The favourites from the group came out to be 3 and 4. I thought that 3 should be quite fun to make if I was able to go to a beach, I could literally create the scene, but for obvious reasons that is not possible right now.
Number 4 would be a pretty simple digital pattern resembling water. I think I could make it quite interesting. Maybe with a gradient in the background?
Next I wanted to think about the actual physical form of this book.
Pocket Edition Design
As a pocket edition, I believe it should be relatively small, perhaps the size of a travel guide. I have some TimeOut travel guides that are 13×20 cm in dimension, I think these would make a good size. Something to also note that this book is not thick at all, even though it has 336 pages. I think there is something to be learned here.
I was also thinking of perhaps creating volumes so, that the book could be carried even easier. Though as I was thinking about all the practicalities of this.. what is you finish a volume and you haven’t got the next volume to hand? Would it make it more awkward to carry all volumes at once if you pleased? I wanted to look into this and see if this is actually a thing in publishing nowadays.
So after a quick google I found this reddit post about the topic:
What do you think about splitting books into two smaller volumes? : Fantasy (reddit.com)
The users here discuss the options around splitting books into volumes.
Also interestingly the first commenter says that their book which was 300,000 words was published as paperback and it was 700+ pages.
According to fairyspell.wordpress.com Robinson Crusoe is 121,961 words, so this would come to roughly 300 pages, obviously depending on layout and typesetting. I think I will need to do some experiments with how many words I can put onto one page without sacrificing good reading experience in advance to see how many pages my book would come out at. I still think that making the book a multi volume release might be an interesting idea, and had a cool thought about how to keep the books together.

I was thinking that the book could be made as one, but with a perforated spine that would separate the 2 volumes. I really liked this idea and felt like this would make the book stand out in a bookshop too, whilst creating something that could easily fulfil the pocket edition brief. This way, I could push the book to be a smaller size because having it would have to have sufficient amount of pages to create 2 volumes.
Treating the book in this way would also serve as a metaphor in my opinion, as it reflect the way Crusoe is broken off of society, to become a solitary figure on his desert island. I was also toying with the idea that the spine could be made to look like 2 planks of wood featuring 2 halves of the book’s title, this way once the book is broken apart it would be a bit like a shipwreck.
I was really excited about this idea!
Somebody later brought the below article into my attention:
I am the ‘book murderer’, but I tear them apart out of love | Fiction | The Guardian
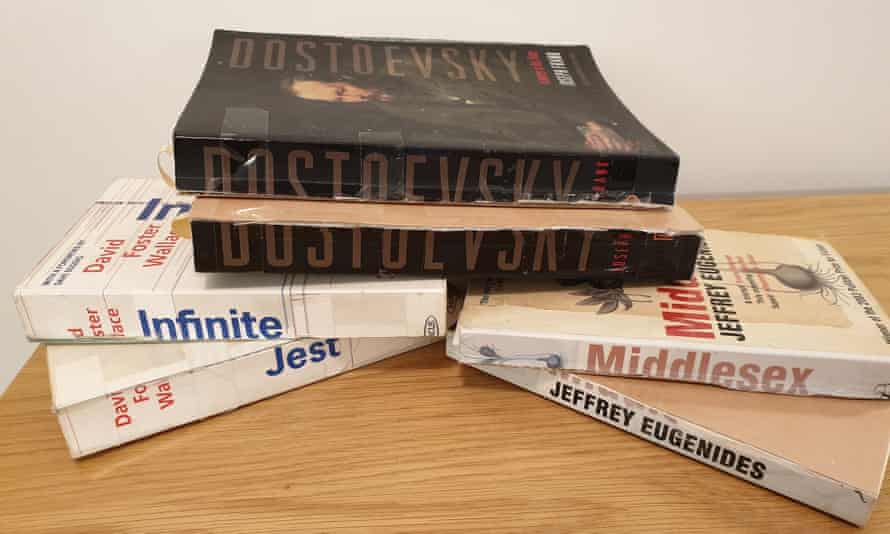
This author chops books into smaller units for more portability! This just confirmed to me that my idea has some legs to stand on.
Calculating the size
I have so many unknowns here though… I still haven’t figured out the sizing of the book. I was wondering how I could figure out how many pages will my book be at certain dimensions. I wondered if there is a tried and tested way to calculate this.
Surely enough I was able to find a handy guide here: Estimate your page count (fionaraven.com)
I decided to go with the smaller non-fiction format (that was very close to the travel guide that I picked out as a starting point) that was suggested here to calculate my page count.
Robinson Crusoe wordcount: 121,961
Book size: 13.97×21.59cm (5.5″ x 8.5″) (Standard size from above site)
With the following attributes:
- a standard typeface for book publishing (Garamond)
- a standard type size (11 pt)
- standard margins
- standard spacing (the first line of each paragraph is indented, and there are no blank lines between paragraphs)
121,961 / 390 ≈ 312
According to the above calculations, the book would turn out around 312 pages with the above attributes.
I felt like if the book was only roughly 300 pages, it would not warrant the 2 volumes. I could perhaps reduce the size slightly to make the book more compact when broken apart?
I wanted to see if I could perhaps do this calculation by laying out a couple of pages of the book at the desired size and see the average word count to calculate this.
I looked at The Watercolour Ideas book next for size inspiration, I think the height of the book is roughly what I had in mind, but it is too wide.

I went ahead and found the text of Robinson Crusoe and wanted to lay out some pages to see how many words would fit on a page. I went with a 136mmx210mm size at first, I can always play with this size based on my findings.

In terms of font, I wanted to find something that is contemporary to go with the feel of the book, but with a nod to the classics like carlson. I cose Bookmania as I think it is a nice, easy to read font with great weight options.

I set a few of the pages with Bookmania Light at 11pt a 13.2pt leading and normal character spacing. The average word count came to 418 per page. I wanted to use this number to see how many pages it would take roughly to lay out the entire novel. According to my calculation, 121,961 words with 418 words on a page would take up roughly 291 pages.
I decided to lay out the entire book and actually the text came to 283 pages total with my current layout. This is just the core text, so I would need to also calculate in the chapter pages, the pages at the back and front with info about the publication and decide whether the novel would feature any illustrations.
I have added in some half pages for the Chapter titles with a rule in mind that the chapter titles should always fall on the right hand leaf of the spread.

Pretty simple. but this has added another 24 pages to my book making it 307 pages total.
I was wondering if this was a small enough format for the book to be considered a pocket edition. I think this format with the option to break the book down into 2 volumes would make it really portable.
Looking at the way the pages were falling, I think that breaking it at page 153 might work really well. This is pretty much exactly at the half way point of the book and just at the point of a real climax of the story where Crusoe finds footprints in the sand.
Paper choices
The next physical attribute I needed to figure out is the thickness of the paper; I considered this very important for this particular project as I needed the book to be thick enough to be broken down into 2 volumes but not too thick that it would be to a detriment of the portability.
Found this handy calculator to help me with this process::
Spine Width Calculator | Book Spine Width Formula (printondemand-worldwide.com)
I had quite a specific thickness in mind. In an ideal situation I think around 3-3.5 cm thickness would be ideal for my idea. The above calculator gave me the below measurements:
70gsm: 17.69 mm
80gsm: 15.77 mm
100 gsm: 13.85 mm
115 gsm: 18 mm
150 gsm: 21.68
This shown me that even with the thickest paper that is suggested for books my book would only be just over 2 cm’s in thickness. I wanted to see what paper stocks G.F Smith has to offer and how they feel when handled.
I found this other calculator that was working based on paper thickness rather than GSM, I think this is generally easier to understand and should be more precise as the thickness of the paper not always directly correlated with GSM. Calculate Thickness of a Stack of Paper (rechneronline.de)
I was thinking that a paper with a slight texture may work well to increase the bulk of the paper used without increasing the weight.
Another thing I needed to probably think about was the price of the chosen paper too. It shouldn’t be too expensive as the book is a paperback, which should be able to make it to the shelves for a relatively small price.
After spending a bit longer on this than I wanted to I realised something. I can control the thickness of the book by the layout of the text much more than by the means of paper choice. Sure the choice of paper is important, but it will have a very small effect on the overall thickness of my book.
So I chose the Lynx Smooth Natural White by G. F. Smith and going to move on to designing the book. (I will probably need to come back to choosing paper for the covers too,)
Designing the cover
Even though I had a rough idea about the cover of the book, I wanted to do some playing around in my design software to see what I can come up with.
I started by re gathering my measurements and creating a canvas to fit these dimensions.

I needed a 302 mm x 210 mm canvas, plus some extra padding for bleed.

I set up my canvas so that the spine was split into 2 halves as I still had the idea to make the book splittable.
Next I wanted to add something to my workspace that would enable me to design in with some relativity in mind. I scanned the cover of The Watercolour Ideas Book and added this to my canvas. This will enable me to look at this object when deciding the size of different elements on my canvas. This was an idea that I just came up with, but would like to experiment with this to see if it helps.
Just as I was doing this, I realised that I got my measurements wrong along the way somehow the book I laid out so far was much larger than I imagined. The above mentioned book was only 166 mm in height! This is the size I wanted to replicate, so I went back to my DPT software to readjust (redo) the layout and see how many pages this will make. I think actually this 20% reduction in size will have the right effect when it comes to the thickness of my book.

I managed to squeeze down the book to 107x166mm size and this took the book to 484 pages. This actually comes to 24 mm, which is much closer to where I wanted to be in terms of the spine width so I am pretty happy with this.


Started by exploring some of the ideas I had initially from my sketches. I had one in mind where there would be waves and the typography and some other graphical elements would sort of float on the surface.

Started to design this in monochrome first so that I would be able to focus on the elements that make up the cover more easily and think about colour as a separate step.
I played around quite a bit with different layouts, keeping in mind that the spine will be split down the middle, tried to keep things balanced and legible at the same tine.

I finally settled on the 4th layout as I thought this was simple yet effective. I still needed to figure out how to present the authors name on the cover and what will go on the back, but I was fairly happy with this.
I wanted to move onto playing with colour.
I have done some gradient based studies recently and wanted to see if I could apply this somehow to my artwork to make it a little more interesting, and perhaps use this to make the design have a bit more depth.

I applied a simple line gradient to my shape with a few different colour stops, and I really liked the results. It was no longer a problem to put certain elements behind others as my shapes were no longer fully opaque.
At the same time I also played around with the distribution of the waves, as I didn’t like how they were too messy.

The waves distributed evenly and fully aligned 
The waves distributed evenly without aligning them
I wanted to make it tidier but not overly so to the point where it becomes boring and pattern like so I have decided with option 2. By aligning creating even spacing between the individual waves, it made the whole lot more uniform but because I played around with the distribution horizontally it has made it a bit more dynamic. I liked these results, but may go back to this to readjust once I see the book mocked up.
I was really happy with the colouring and wanted to see how I could make the typography a little more interesting, or if I could find a font that better fits the brief. I have come up with a few variations for this and compared them side-by-side to see which one clicks the most.

Abolition 
Antiquarian 
HVD Rowdy
I tried some different fonts for the design. I was looking for fonts that were slightly weathered and rough to connect with the story a bit more. I was also looking out for fairly tall fonts to make it so I could split the spine and have the 2 halves still mostly legible.
I thought the the first option looked a little crime novel like and was perhaps too safe. Number 2 was a nice nod to the classicality of the novel with the serif font, but I felt like it wasn’t particularly eye catching.
My favourite was number 3. It had some issues with legibility I think, but this made it all the more exciting. I think this font screams adventure. It has a sort of cobbled together quality, like it is made of pieces of leftover wood or something like that. I really liked this quality about it. I had some concerns about the spine being legible when split, but I think the character this font gives to the cover far overweighs what is happening with the spine.
I was wondering that maybe the author name will need to be a little more tame, so that it doesn’t pull attention away from the title.

I quite liked the way the book looked when mocked up. It was vibrant and eye-catching. Had some issues with the layout as I needed to add the cover to 2 books surfaces, but this is something I will be able to solve quite easily. I made another mockup to see how this would look when split into the 2 volumes.

This actually made me realise that if I keep the spine as is, and make 2 slightly different covers, so that the front cover is nicely fitted into the frame, it would actually work better as then the full title is actually on both of the volumes. This really shown me that mocking up in this fashion can really help work out physical designs better.

I set up my covers with 2 slight variations, 1 with the spine shifted to the left and the other one to the right. This means that each of the volumes would have the full title present on the spine but you would only see half of it when the books were put together.
I mocked up my books in a scene:

Finishing touches
Added a piece of string that would keep the books together when you wanted them to be bound together after you broke the spine. I think it is a nice idea and adds something special to the book. I couldn’t figure out how to show the fact that the book’s spine is perforated, I think I may do this in photoshop, but didn’t want to fiddle with this much more as I felt like I spent way too long on it as is.
I also decided to make the typography a gold foil on the cover to make it pop a little more. Although I wasn’t sure how this would connect with the content, I really loved how it looked, and I think it does elevate the design somewhat.
There is always more I could be fiddling with, but overall, I am happy with what I created here and feel like I am ready to move onto the deluxe edition of the book.
Deluxe edition
For the more premium collectors edition I wanted to make the book much larger, so probably around 16×24 cm. This is a number that I came up with based on some research and looking at some books around me for size inspiration.
I would like this book to have heft, so I think the material choices would be paramount.
I was thinking that the book should be leather or cloth bound with some embossing on the cover to give that premium feel. I would like to keep the colour palette to a maximum of 3 but preferably 2 colours.
As this would be a collectors edition, I would like this book to have a nod to the original and include some full page illustrations.
It was time to create some sketches of what I had in mind for this cover.

For this more premium version I wanted to keep the cover relatively simple. I thought that I could design the cover to be printed in foil on leather binding this would give it a really premium feel.
I think my favourites are Number 3 (top right) and number 6 (bottom right).
I like no3 because of the nod to the original, I think this could look pretty nice if the right font is chosen and I carefully consider layout of the text an choose nice understated icons for the corners.
In terms of no6; I think because it is so simple it would be really elegant and understated if executed well with the correct font and the right iconography.
Because this is meant to be a collectors edition, I think I am going to start with no3 and see how it looks, then if it doesn’t work out I still have the option of doing the second idea as a fallback.

I’ve started designing the cover bit by bit and have come really far, but then I had a massive block when coming up with an illustration for the 4th corner of the cover.
I wanted to try this out as metallic foil on a leather bound book for that premium feel. I went to my 3D mockup software to test this out.

I think I liked how it was looking in my mockup but still needed to design the spine and come up with a small illustration for the 4th corner of the cover.
I was thinking that the gold foil would be on a shiny plastic dust jacket to make this durable, under this, there would be a leather cover in a nice green-blue colour with the same cover design. I was also thinking that I could separate some of the elements and some things could go on the cover itself and some others on the plastic sleeve. That way I could perhaps play with the dimensionality of the design a bit more and make it just a bit more special.
I shown this to some people and I got the feedback that the shininess of the plastic sleeve was kind of distracting from the premium feel that I was trying to achieve. I wanted to test this out without the plastic cover to see how this would feel if the leather texture shown through more.
I have found a nice textured leather that I added to the cover instead leaving off the plastic cover.

Finally I wanted to see how the 2 different editions would compare to each other. I think this is where the differences in terms of size and the texture of the objects can be shown most effectively.

I feel like the designs I made for both editions are quite unique but still have something that connects them. The colour scheme is very similar in a way but the application of this is slightly different.
I am really chuffed with how both of these book designs have turned out and I was ready to move onto the last part of this assignment, designing the guide book.
Washed ashore: The ultimate guide to surviving on a desert island
I started this by looking up some guide books for inspiration when I bumped into this poster from the V&A.

I really loved this style of simple illustrations that you would normally see in manuals of various products. This sparked an idea that this would make an excellent basis for my book.
This would most probably not be great as a cover, and I also wanted to keep it a bit simpler for time’s sake as I have spent quite a long time on this assignment, but I wanted to see if I could perhaps design a couple pages like this to show what the book would look like on the inside.
I wanted to start by researching the content a little to see if that inspires what I could be doing with the cover for this book.
Found this guide: How to Survive on A Desert Island – Let’s Buy An Island I think there is quite a bit here that I could use to start creating some sketches.
I also remembered a book I seen when I was looking at different designers that was made for Snoop Dogg.

I really thought that there is something in this that would be super useful if we took it to a desert island setting. Although I realise that this book wouldn’t necessarily be there when you end up on a desert island, I thought that a book that could light matches would be terribly useful. From this I went onto thinking that perhaps the book could be made with some matches included too… perhaps like a match book in a bar?
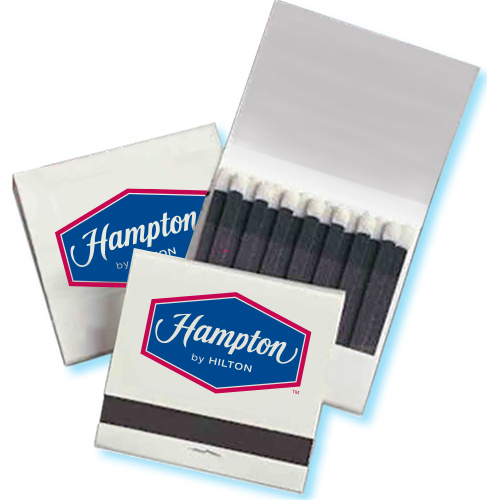
I was thinking that this could make this book stand out and it would be a pretty fun play on the topic. If you were deserted on an island and you had this book with you I think it would be super useful. Not sure if this would be just super gimmicky and not very achievable though. I will keep this idea in the back of my mind and will try to include it if possible.

I actually really liked how the matchbook sketch was looking. Maybe it would be the time to do something a little more experimental?
At the same time I tried to look at some survival guides to see what kind of design language they were using. I put together some images that I found online to further inform the design process.

As I was looking at these I tried to identify what makes them recognisable of being from this particular genre.
My observations are below:
- Bold typography – Sans serif fonts
- Military colours
- worn textures
- Silhouettes
- Warning sign like elements
This was a good start for me to start thinking about what I might put on the cover. Some elements that are associated with survival in the wilderness such as drinking water, fire, shelter and weapons would most probably work well.

I was looking at the above books and wanted to create some further layouts for the covers. I think my favourites are no1, 3 and 4. I also liked the idea of the SOS in the sand with the title being carved into sand, but was worried that this would not read well for the cover and it would confuse the readership.
In terms of size I was thinking that it would be nice to try to make this the same size as my pocket edition of Robinson Crusoe. I think this would make sense as a pocketable small book. I don’t have info on how many pages this would be but I will assume around 200 pages maximum so it would be roughly the same thickness as 1 volume of the paperback RC book.

I played around with a few fonts and layouts and after about an hour of playing around I have settled on this.
I really liked how this font had a feel of some tyre marks in the sand. I made this effect totally by accident because I was trying to make the part that is submerged in water more legible, but I really liked the results so I decided to keep it.
I was thinking that some interesting treatments could be applied to this cover to make it quite eye catching, such as embossing or even some UV spot application where the water is to create a more rich surface to the book.
I have mocked up the guide along the other books to see how they look all together.

Reflection
I have worked on these 3 books for quite a while, but I must say I could have spent at least another 2 months playing with different ideas and finishes. I think this assignment was great as I needed to consider all the different things I learnt in this part, such as paper weights and finishes.
I feel like I could have done more in terms of experimentation with different ideas from my sketches as some of those may have been better, but even with just working through the 3 ideas it has taken me over 3 weeks to work through this assignment so I feel like I have done enough to call this finished.
I should have spent some more time creating layouts for the pages of these books, I have only done this for one of the books, I think I should have done this for all 3.
Another thing that I realised towards the end of this assignment is that the books don’t really look like a part of a series, however I have included the wave pattern in all of them that ties them together thematically, however I feel like I could have done a better job making them more cohesive.
I am pretty proud of how the designs turned out and quite pleased with my mockups showing the different finishes that I hope make these designs a little more interesting to look at and handle.
I think my favourite is the first design for the paperback version of the book, this is probably because I have really thoroughly considered this design and all elements of its physical form.
I am very happy with how this part went although it has taken me much longer than I hoped.
